Home Services

Drain Cleaning – How to Get Rid of Clogged Drains

Drain Cleaning Perth is important to keep your plumbing and sewage systems working properly. Keeping your drains free of gunk can prevent blockages from becoming severe and costly to repair.

Some clogs are easily cleared with a plunger or household baking soda and vinegar, but larger or tougher ones need professional help. Here are some methods that professionals use to clean drains.

The 10 Best Drain Cleaning Services Near Me (Free Quotes)

One of the most effective methods for drain cleaning is hydro jetting. This involves using a highly pressurized water jet to blast away any debris that has accumulated inside your pipes and remove stubborn clogs. This method is quick and cleans the entire pipe length, leaving your plumbing system in tip-top shape. It can also clear tree roots that have infiltrated your sewer lines.

Hydro jetting is especially useful for severe blockages that have not responded to traditional methods, like snaking or chemical cleaners. The high-pressure water jets can break apart and remove even the most stubborn grease, soap scum, or mineral deposits from your pipes. The scouring action of the water also eliminates the odor-causing food particles that are often trapped in the drains. The process is fast and can be completed within a few hours, saving you valuable time and money.

The high-pressure water jets also clean your pipes thoroughly without causing any structural damage, which can help prevent costly repairs in the future. Moreover, it is safer than liquid drain cleaners because it does not contain any chemicals that can contaminate your home and the environment.

Another benefit of hydro jetting is that it can be used in homes with older pipes. However, it is essential to have your drains inspected before using this method. Some pipes may be too fragile to handle the intense pressure of the water. A plumber can determine if your pipes are suitable for hydro jetting during an onsite inspection.

If your clogged drains aren’t addressed promptly, they can cause serious health problems. Untreated sewage backups can lead to dangerous bacteria, viruses, and other contaminants that can spread throughout your house. Therefore, it’s important to take precautionary measures to protect your family and your property. If you notice that your drains are not working properly, call Patrick Riley | Isley’s immediately for hydro jetting services. Our professional plumbing technicians can quickly and safely remove all clogs, blockages, and other debris from your drains and sewer line. We will also use a video inspection to check your sewer lines for any potential damage.
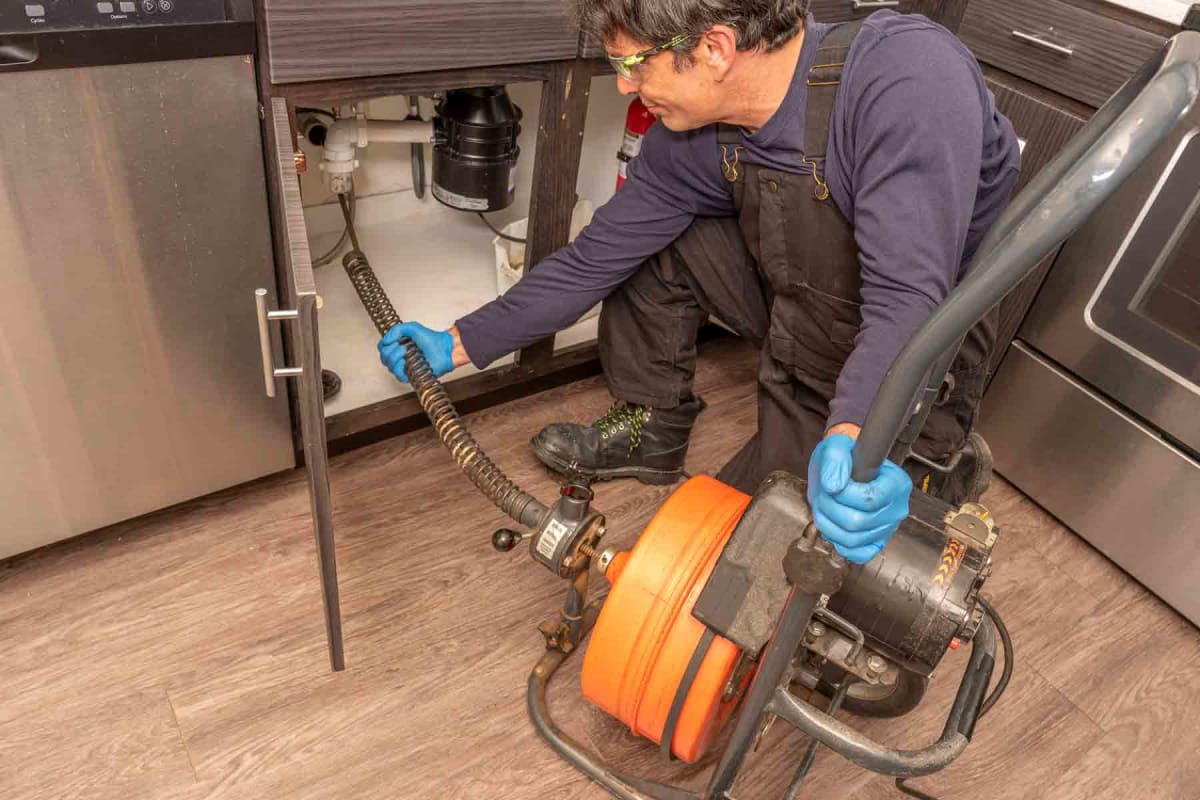
Plumber’s snake

A plumber’s snake (also known as a drain auger) is an essential tool for removing stubborn, difficult-to-reach blockages in plumbing lines. It’s a long, flexible metal cable with a handle on one end and a corkscrew-shaped head on the other. The snake is fed into a drain pipe until it meets the obstruction, then rotated to break up or hook the clog. The clog is then pulled out along with the snake.

A plumbing snake can be used to unclog toilets, bathtubs, sinks, and other drains. To use the snake, first remove any covers or grating over the drain opening. This will give you a better view of the obstruction and allow you to feed the snake into the pipe. If you’re snaking a toilet, place an old towel down to catch the mess. To avoid damaging the pipe or plumbing, it’s important to use a snake with the proper size and type for your pipes. An improperly sized snake could get stuck, loop back on itself, or scrape the interior of the pipes.

To use the snake, insert the tip into the drain or pipe opening and slowly crank the handle to advance it. Once the head of the snake reaches the obstruction, gently apply pressure to it while rotating it. Avoid using excessive force, as this can damage the snake or the pipes. The goal is to disintegrate or latch onto the clog, then pull it out and flush it away.

Home improvement stores carry a variety of affordable plumbing snakes for DIYers. However, you may need to call in a professional if your drain is very deep or made of metal that won’t budge with a snake. Professionals also have access to a wider range of snake heads for specific jobs, and can extend the snake’s reach if necessary. In addition, they can use high-pressure water jets to blast through stubborn clogs and prevent them from returning. A professional can also help prevent future blockages by recommending regular maintenance like installing metal screens and sink traps, as well as a water softener that helps keep mineral build-up from damaging pipes.

Baking soda and vinegar

Baking soda and vinegar are a popular natural drain cleaner and can be used in place of chemical products. The combination produces a fizzing reaction that breaks down organic clogs and dissolves certain types of mineral deposits. This method is inexpensive, safe for the environment, and can be used on sinks, tubs, showers, and garbage disposals. However, it is important to use this method in a well-ventilated area and to wear rubber gloves to avoid contact with any residue that may remain in the drain.

Before using baking soda and vinegar to clean a drain, remove any visible debris and hair from the drain cover or strainer. This will help prevent the clog from spreading and will allow the solution to work more effectively. It is also important to ensure that the trap and vent pipes are clear of obstructions.

Once the drain is cleared, pour a large pot of boiling water down the drain to flush out any remaining baking soda and vinegar. Repeat this process once a week to keep your drains and garbage disposals free of clogs and odors.

While this method is effective for minor clogs, it is not suitable for serious blockages. It is also not recommended for metal pipes, which can be damaged by the acidic vinegar. In addition, the chemical reaction that occurs between baking soda and vinegar produces carbon dioxide gas that can build up inside the pipes and create pressure.

Another natural drain cleaning option is to mix hot water with liquid grease-fighting dish soap, such as Liquid-Plumr. The combination will break down greasy fats, dissolve hair clogs, and remove odors. It is also a good idea to regularly flush your drains with boiling water to prevent future clogs.

Although Coca-Cola may seem like a promising natural drain cleaner, it is not very effective in most cases. The sugar in the drink can actually clog your pipes, and the phosphoric acid in the soda will react with vinegar to produce more carbon dioxide gas, which can further damage your pipes. In most cases, it is best to use a plunger or drain snake to remove the clog.

Chemical cleaners

Chemical drain cleaners are often sold as a quick fix for clogged pipes, but they’re not without their risks. These products typically contain toxic chemicals that can damage your pipes, overwork your plumbing system, and even cause environmental damage. Here’s why you should skip the chemical drain cleaners and opt for a professional plumbing service instead.

Safety Concerns

Chemical drain cleaner products usually contain caustic substances like sodium hydroxide (also known as lye), which can cause serious burns if it comes into contact with your skin, eyes, or lungs. They also generate fumes that can irritate the nose, throat, and lungs, triggering asthma or respiratory issues. Inhaling these fumes can also be deadly if the chemicals are inhaled over an extended period of time.

They’re also dangerous to use in environments where there are children or pets. These products can corrode metal pipes and cause plastic pipes to weaken or break. They can also be damaging to septic systems, which rely on natural bacteria to breakdown waste and keep the plumbing system running smoothly.

Most chemical drain cleaners work by generating heat to melt or dissolve clogs. They also use chemical reactions to donate or receive electrons from the clog-causing substance. Caustic cleaners use a reaction involving sodium hydroxide to decompose hair, fats, and oils into water-soluble compounds. Oxidizing cleaners use household bleach, peroxide, or nitrates to oxidize organic materials and break them down into smaller molecules that can be washed away.

These chemical cleaners aren’t effective for serious or complete blockages. They can also be harmful to your plumbing system if used frequently or if the clog is caused by an obstruction that’s too large for them to break up. They can also be corrosive to older metal pipes and may soften or wear down PVC pipes over time.

Chemicals in chemical drain cleaners can also seep into groundwater and rivers, contaminating the environment and causing harm to plants and animals. If you’re concerned about the environment, choosing a professional plumbing service that uses eco-friendly drain cleaning methods like hydro jetting is a better option.

Home Services

Types of Ceilings

Ceilings Perth are the overhead interior surface that can significantly impact the acoustic properties of rooms and lighting designs. They also play a crucial role in the structural integrity of the building.

While conventional plasterboard ceilings are common in many Australian homes, other options can add visual interest and acoustic control to any room.

How to fix water damaged drywall or ceiling - C&S Painters

Wood ceilings offer a beautiful design option that complements any aesthetic. They’re also natural, improve acoustics, and provide a range of practical benefits. This includes insulating properties that help control indoor temperatures and reduce energy costs. Wood has natural air pockets embedded within its grains and a cellular structure that makes it highly adept at retaining cold and heat, reducing the need for artificial heating or cooling.

While paint colors, flooring, and furniture choices are often top of mind when designing a space, ceilings can make just as much of an impact. A simple coat of paint can give a room a pop of color or texture, but other materials like wood beams and shiplap can add eye-catching flair without taking up valuable floor space.

Whether you’re looking for a rustic country cabin or an urban modern loft, there are many ceiling designs that incorporate wood to create the perfect look. From coffered and tray ceilings to wood paneling, there are endless ways to accent these unique ceilings.

Shed ceilings are an attractive and functional ceiling design that’s a great alternative to traditional drop ceilings. They can be painted or stained to match the rest of the décor and are an excellent choice for acoustic or energy efficiency purposes. Wood ceilings are durable and long-lasting, but they’ll need regular maintenance to keep them in good condition. A yearly coat of sealant will prevent warping or deterioration and keep the wood looking fresh.

While wood ceilings aren’t as prone to fires as other ceiling types, they do present some challenges when it comes to installation. For example, they require a high level of precision and skill when installing in close proximity to MEP fixtures. As a result, it’s important to work with an experienced contractor to avoid any costly mistakes.

Unlike wood floorboards, wooden ceilings can be cut to size and installed using a system of prefabricated panels that snap into place. This allows for a quick and easy DIY project, but it may not be the best solution for spaces that require more extensive repairs or modification.

Metal

Metal ceilings are gaining popularity in modern commercial designs for their durability, sustainability, and eye-catching appeal. They may be more expensive upfront than traditional gypsum ceiling products, but their longevity and minimal maintenance requirements make them cost effective over the long term. The inherent strength of these ceilings enables them to withstand impact and reduce energy costs while also enhancing acoustic performance.

Durable metal ceilings can be specified to meet a variety of design and performance requirements, including humidity and fire ratings. They can also be integrated with other services, such as lighting and sound-absorbing fleece, to further enhance a space’s functionality. These durable ceilings are an excellent choice for high-traffic areas, and can be cleaned to remove dust and dirt without compromising their structural integrity or aesthetics.

Designers can add visual interest to their projects with a variety of different perforation patterns. From staggered linear patterning to bold arrays of uniform circles, metal ceiling options offer design flexibility that can be complemented with lighting and acoustic backers. These ceilings can be designed to create a dynamic pattern across panels that seamlessly transition from wall to wall, or they can function as metal suspended ceilings for enhanced acoustic performance.

In addition to their attractive appearance, these ceilings are easy to install. They can be installed over existing acoustic ceilings or in new construction, and they are also compatible with various types of mechanical systems. They are resistant to mold and mildew, making them an excellent option for kitchens or other cleaning-intensive environments. Additionally, they are inherently anti-microbial, which helps to improve indoor air quality.

The expert team at CertainTeed Architectural brings in-depth technical consulting and practical problem-solving skills to ensure your project is engineered for trouble-free installation as well as eye-catching design. Our experience and expertise enable us to provide a wide range of ceiling solutions that will complement your interior or exterior architectural vision. From the curved shapes of our timeless DOMUS line to the contemporary geometry of our FLUID, we can bring your design concept to life.

Beamed

Ceiling beams are a popular way to add character to a room. They can be incorporated into various types of interior design styles, from rustic to modern farmhouse. While some homeowners shy away from exposed beams because of the difficulty involved in installing them, there are ways to integrate this dramatic architectural detail into a home that makes it look seamless and beautiful.

If you’re converting an older house with conventional flat ceilings into a vaulted space, you may want to choose a simple style for your exposed beams. If you want a more traditional or rustic look, use wooden beams that match the color of the walls. For a modern touch, try using a painted faux beam.

While beams are typically made of wood, they can also be made of other materials such as concrete and steel. For example, a vaulted ceiling constructed with scissor trusses may feature a combination of glulam and steel beams. While both steel and glulam are strong, they’re not as visually appealing as wood beams.

Another option for a beamed ceiling is to make the exposed beams appear decorative rather than structural, by covering them with drywall. This creates a more clean and contemporary look. You can even paint the drywall to match the beams and walls for an integrated style.

It’s important to note that while ceiling beams can enhance the overall design of a room, they can also make the space feel smaller. It’s recommended that homeowners carefully consider their room’s dimensions before implementing ceiling beams, especially in small rooms.

A good idea is to use a light color for the ceiling and beams, which can make a room feel larger and more open. Then, you can use darker accent colors to highlight features of the room such as molding or fireplaces.

For a bolder look, you can cover ceiling beams with patterned wallpaper for an unexpected pop of color. This design feature is perfect for a dining room or kitchen like this colorful dining room by Colleen Simonds or this bright and airy kitchen by Desiree Burns. Matching the color of the wallpaper with the beams and paneling will keep the ceiling from becoming too jarring or overwhelming.

Fiberglass

Fiberglass is a common material found in many different household and commercial items, such as ceiling tiles, shingles, flooring, carpeting, and cars. It is a tough and durable material that can withstand a lot of wear and tear. It is also easy to install, saving you time and money. This makes fiberglass ceilings a popular choice for many homeowners and contractors alike.

Unlike other ceiling materials, fiberglass is non-combustible and won’t contribute to fires or increase their spread. This feature is especially important in areas where people will be present, such as hospitals and clinics. It is also resistant to moisture, making it ideal for areas that might experience high humidity levels, such as bathrooms and kitchens.

Another advantage of fiberglass ceilings is that they are designed with sound absorption in mind, which can help to reduce noise levels in a space. This can make a room or building more comfortable and enjoyable for everyone. Moreover, fiberglass can help to save energy costs by reducing the amount of heat or air needed to keep a space at an acceptable temperature.

If you choose to use fiberglass ceiling tiles, it is important to prepare the surface before installing them. This will ensure that the tiles adhere correctly and do not fall off later. The area should be clean and dry to create a smooth base for the tiles. It is also a good idea to use adhesives that are specifically designed for this type of ceiling tile, as they will provide a strong bond and prevent water damage.

Fiberglass ceilings are also easy to clean and maintain, so you can rest assured knowing that they will stay hygienic and safe for patients. This is particularly important in healthcare facilities, where germs can easily spread from patient to patient. Fiberglass ceilings are designed with no seams or cracks, which means that they will be easier to wipe down and sanitize. They are also resistant to moisture and regular cleaning products, making them a great option for places that need to be kept sterile.

Whether you’re looking for a new way to decorate your home or office, a fiberglass ceiling may be the perfect option. These ceilings are available in a variety of colors, textures, and designs to suit any decor style. They are also easy to maintain and can withstand a lot of wear and

Home Services

What Goes Into a Bathroom Remodel?

A sleek, updated bathroom adds value to your home. But what goes into a quality remodel?

Material conjunctions play a big role in your remodel costs. Be sure to compare prices and shop around before you commit to a project. Contact Bathroom Remodel Tacoma WA now!

21 Bathroom Remodel Ideas [The Latest Modern Design]

Keep in mind that some remodeling projects require a permit. Whether it’s to replace a toilet, install a new tub, or change the floor plan, obtaining permits can increase your renovation budget. 

Aesthetics

Bathrooms are not only utilitarian spaces, but also provide a relaxing retreat. A bathroom remodel is a perfect opportunity to add elements of style and comfort. The smallest details, such as the color scheme and accessories, can enhance your bathing experience and create a sense of luxury. For example, a beautiful hand towel or artwork can bring a pop of color to the room and create a cohesive look. Similarly, optimizing storage solutions and adding greenery are simple ways to enhance the ambiance. Choosing natural materials and colors can create a soothing atmosphere, while incorporating smart technology can make daily tasks easier.

A bathroom remodel can also help to improve your home’s value and increase the marketability of your property. Typically, a bathroom remodel adds $15,000 or more to a home’s overall value. This is because buyers are drawn to modernized functionality and aesthetics, both of which are reflected in the remodel’s return on investment.

Depending on the style of your remodel, you can choose from a wide range of design aesthetics. A minimalistic aesthetic, for example, focuses on clean lines and an open concept layout. Other popular aesthetics include a natural oasis, which combines earthy textures and colors with a spa-like ambiance; and contemporary glam, which emphasizes opulent materials and a bold design.

Once you have selected the aesthetic that best fits your personality and lifestyle, the next step is to create a functional and efficient bathroom. This involves assessing your existing space, establishing a budget, and setting clear objectives for the project, such as increasing functionality, enhancing relaxation, or improving sustainability.

A remodeling expert can assess your current space and recommend the most suitable changes for your needs. They will also help you to stay within your budget by prioritizing specific upgrades. They can also offer suggestions for creative storage options and integrating smart technology into your bathroom. In addition, they can assist with determining the optimal layout to achieve your desired aesthetic. Finally, they can help you select materials and finishes that are energy-efficient and eco-friendly. This ensures your bathroom is a sustainable space that reflects your lifestyle and tastes.

Functionality

Bathrooms have to be functional for the people who use them. Many of us use the bathroom for daily hygiene and self-care. Having luxurious features in your bath can elevate the experience and make it feel like a personal oasis.

A bath that is not functioning well can quickly become cluttered and messy. What is needed is a place for all of the items that are used on a daily basis to be stored within arms reach of a person standing in front of the sink. This may mean that base cabinets have to be reworked to allow for more storage or deeper medicine cabinets added with electrical outlets inside the doors.

A good set of tools should be on hand for any repairs or upgrades. A standard level, tape measure, hammer, and drill with bits and driver should be adequate for most remodels.

Safety

Whether you’re renovating for yourself or your family, safety measures should never take a back seat. Every year, thousands of people visit emergency rooms due to bathroom-related injuries, many of which are caused by slips and falls or scalding water.

Integrating safety elements into your bathroom renovation can dramatically reduce the risk of accidents, boosting comfort and convenience for everyone. These measures are especially crucial for households with elderly family members, children, or anyone with limited mobility or health concerns. Safety upgrades like non-slip flooring, grab bars, and proper lighting can all significantly reduce the risk of injury.

Safety features can be expensive, so it’s important to prioritize your needs and budget during the planning process. To help keep costs low, consider incorporating these features into your remodeling plan in stages. For instance, you can install non-slip floors and grab bars during your gutting phase to reduce the need for costly replacements later on. You can also find inexpensive DIY options, such as faucet covers and non-slip mats, that don’t require professional installation.

Another way to save money is by using existing fixtures, such as your toilet and bathtub, in your new layout. This is an ideal option for small bathrooms where space is limited, and it can also reduce the cost of your remodel by allowing you to skip the tub-to-shower conversion.

One last piece of advice is to use caution during demolition and cleanup. It’s essential to carefully follow all local regulations regarding hazardous waste disposal, and always wear protective gear when handling hazardous materials. Additionally, it’s a good idea to rent a dumpster for your demolition debris. This will save you from having to haul trash to the dump and allow you to recycle as much as possible.

As you begin your remodeling project, don’t forget to label all electrical wiring and plumbing pipes so you know where they are located. This will prevent you from damaging these connections as you remove and replace fixtures. It’s also helpful to have a wet-dry shop vac on hand in case you encounter any unexpected water leaks or flooding during your remodel.

Storage

A well-organized bathroom is essential to a comfortable and functional home. Remodeling your bathroom is the perfect opportunity to implement smart storage strategies and elevate your living space.

Whether you prefer a clean, modern aesthetic or a warm, rustic retreat, the right design options will make your bathroom feel stylish and organized. To create a clutter-free bathroom, start by mapping out your available storage space and determine which items you want on display and which should be stored away for a cleaner look. Then, choose a style of cabinetry that meets your needs and complements your bathroom’s decor.

Recessed Shelving and Niches

Installing recessed shelves into an unused wall cavity is a simple way to add versatile storage to your bathroom without taking up floor space. These hidden storage areas can be used to store toiletries, decorative accents, and more. You can also install a narrow shelving unit, called an etagere, to maximize storage space in tight areas. These units can be used to hold towels, bath products, or decorative accents and are a stylish alternative to traditional bathroom furniture.

Creative Storage Solutions

Various storage solution trends have become popular in bathrooms, including open shelving and custom vanities. Shelving offers flexibility and a minimalist aesthetic, while custom cabinets provide a more tailored design that can include built-in shelving and drawers.

Over-the-door organizers are another clever hack for maximizing storage in your bathroom, keeping cleaning supplies and other necessities neatly tucked away. Drawer systems are another effective storage solution, with options like dividers and grids that keep smaller items organized. Pull-out shelving units are another innovative option that houses things like hair accessories and personal care items to reduce countertop clutter.

Another way to add storage to your bathroom is by incorporating pull-out laundry hampers into your vanity. This keeps dirty linens off the floor and out of sight while providing a designated spot to throw away trash. Other smart storage solutions include a pull-out step stool in your vanity, which makes it easy for kids and adults to reach higher shelves.

A bathroom remodeling project can be an excellent way to increase the functionality and resale value of your home. Whether your outdated bathroom is in need of minor repairs or you are looking for ways to maximize the space, a professional contractor can help you create a beautiful, modern space that suits your lifestyle and taste.

Home Services

How to Repair a Cracked Window

If your window has a crack in it and you can’t wait to have someone come and replace the glass, you can do a few things to temporarily protect the frame and keep cold drafts from entering your house. First, wear protective gloves and eye protection.

Clean the area around the crack. This will help the repair adhesive stick well. Click the Window Repair Naperville IL to learn more.

How Much Does Window Repair Cost? (2023 Prices)

A continuous strip of cloth, paper, metal foil or plastic film coated on one or both sides with an aggressive, permanently tacky adhesive. It can stick to almost anything by applying light pressure and is often used to temporarily hold things in place until they can be removed tracelessly or repositioned more easily. It comes in roll or sheet form and can be made in just about any shape imaginable.

Glass and window repair professionals use a wide variety of tape to perform many different tasks in their work. One of the most important pieces of equipment is a caulk gun, which is used to apply the caulk that seals gaps between the window frame and the exterior trim, preventing air and water leaks. Another essential piece of window repair equipment is a screwdriver, which is used to remove and install the new window.

If you’re looking for a temporary fix for broken glass, a piece of plywood will do the trick. If you’re working on a historic home with leaded glass windows, though, the best option is to solder the runs back in place using irons and solder similar to that used when the frames were built. That is the only way to restore the appearance of the window and protect it from further deterioration.

Cardboard

Whether it’s the result of a friendly ball game, a spring wind storm or another reason, if you have a broken window, the first thing to do is secure it. Cordon off the area surrounding the glass to protect yourself from stray pieces of jagged glass that can cause injury. This may include removing the shattered glass from inside and outside the frame, a process that’s most effective when done with gloves to ensure you don’t injure your hands. Once the glass is removed, dispose of it safely by wrapping it in newspaper or cloth and placing it in a cardboard box. You should also vacuum the area, and be sure to check under furniture for shards that may have fallen underneath.

Once you’ve cleaned the area, it’s time to make a more robust barrier to keep moisture and debris out until you can get the window repaired. A simple solution is to use a piece of plywood that’s a little larger than the window frame. You can also use a heavy tarp or plastic sheet.

If you want a slightly sturdier temporary fix, consider covering the entire window opening with plastic wrap and duct tape. The wrap will provide a protective barrier from the elements, as well as keeping moisture and debris out until you can have it replaced professionally.

Cardboard is a versatile material that can be used in a variety of ways, including protecting and insulating windows. It’s primarily made of paper fibers, which can be derived from either recycled or fresh wood pulp. The resulting layered material is then processed to produce the rigid, lightweight cardboard we know and love.

Start by preparing your work space by laying a sheet of cardboard or newspaper on the floor near the window to create a padded surface for working. Clear away any curtains or blinds to prevent them from becoming a projectile during the replacement process, and cover floors with a blanket or tarp for protection.

Before you begin working, it’s important to degrease the shattered window surface with acetone or gasoline. This removes any oils and dirt that could interfere with the bonding of your repair materials to the glass surface, ensuring the best results.

Glass Film

Window film is a flexible, laminated plastic material used on glass windows in homes and commercial buildings. There are a wide range of window films available, offering different benefits such as solar control and privacy, and decorative aesthetics. These products are often made of multiple thin layers of PET film, with pigments or dyes added to darken the window and other coatings that can reflect or absorb energy. Some window films have ceramic particles infused to provide additional performance.

Window tint and film are typically applied to the inside surface of a window, although there are special variants that can be installed on the outside under certain circumstances. Despite the different types and constructions of window film, they all offer specific protection from the sun’s UV rays and other harmful elements. Window film can also protect against impact damage from flying objects, whether caused by accidents or natural disasters.

When it comes to home improvement and maintenance, window film is a popular and inexpensive option for adding a touch of style and security to existing windows. Professionally designed and installed window film can help to reduce glare and minimize energy bills, while enhancing privacy and security. It can also help to keep indoor temperatures more stable during the winter by preventing radiant heat from escaping through the windows, which in turn reduces wear and tear on your heating system.

Many homeowners install window film themselves to save on installation costs. However, this is a very technical and time-consuming process that requires precise measurements of the window’s dimensions as well as careful consideration of pressure and temperature changes. This is not a DIY job, and it’s not uncommon for people to make mistakes that can lead to glass breakage.

If you have a damaged window pane that you need to repair right away, you can use self-adhesive emergency glazing film to temporarily hold the broken glass together until it can be replaced. This product is ideal for keeping your family and employees safe from splintering glass while you wait for a replacement. Every box contains a 1m x 15m roll of heavy duty clear self-adhesive window film with a release liner and adhesive that can be cut to size for quick application to the damaged glass.

Epoxy

Broken glass around the home is a reality that many of us have to deal with. Whether it’s picture frames, mirrors, kitchen glassware, or door glass, short cracks can develop into long ones that threaten the integrity of the item and may lead to its destruction. Fortunately, there are easy and inexpensive ways to repair cracked glass in order to keep it safe and prevent it from becoming more dangerous.

One of the most common types of glass that needs repairing is window glass. Often, it is the result of a small crack that is caused by an impact or another object rubbing against the frame. This type of damage can be repaired with the help of epoxy, which will create a strong and sturdy bond. This glue works well for all types of glass, including plain, tempered, and laminated windows.

Epoxy is also a popular choice for repairing damaged wood, such as that found in window frames. It can be used to fill in cracks, and can even be used to completely rebuild rotting or decayed areas. This is a great way to repair the underlying structure of the window while also protecting it from moisture.

It is important to note that epoxy does not work on all materials. Metal, for example, is a material that will not bond with epoxy, so it should never be used to glue these surfaces. If you are working with metal, you should use a specific type of adhesive that is made for this material.

Other materials that can be bonded with epoxy include plastics and concrete. It is best to use an epoxy designed specifically for these purposes, such as Loctite Metal/Concrete. These products have a static nozzle on the applicator that mixes the resin and hardener for you, which makes them easier to work with than other types of epoxy.

When using epoxy to repair a broken window, it is important to prepare the surface before starting. First, lay down a piece of clean cardboard on the work area, and make sure to do so in a well-ventilated area. This helps to prevent the epoxy from dripping and staining your furniture or other items nearby. Next, remove any dust or dirt from the surface of the window to ensure that the new glue will stick as effectively as possible. Finally, it is important to sand the newly glued area smooth. Start with a coarse-grit sandpaper and move to finer grits to ensure a flawless finish.