Home painting can seem like a daunting task, but many steps need to be taken to achieve a beautiful, finished product. Professional painters have much institutional knowledge about the little things that can make or break a paint job.
Before you hire a professional, request detailed bids from several painters and ask them for names of satisfied customers. Call these customers and visit their homes to inspect the work. Click https://bunburypaintingservice.com.au/ to learn more.
A good home painting job starts with an even surface, so the first step is to clean the walls and remove any debris or blemishes. Then, the wall should be lightly sanded to smooth the surface and ensure the paint will adhere properly. This preparation step is vital and is something the best house painters take very seriously.
The next important step is to move or cover any furniture in the room that’s being painted. This will help to prevent damage to the furniture, and it will also protect it from paint splatter, which can be a real problem if it’s not done properly.
This is particularly important in rooms that you and your family use regularly, such as the living room or kitchen. It may be necessary to move large pieces of furniture, such as sofas and suites, into another room or storage for the duration of the painting project. It’s also a good idea to cover any floor coverings, such as carpeting or wood flooring, with plastic sheeting to avoid unwanted spills or splatters.
It’s also a good idea to take this opportunity to fix any cracks or blemishes, such as peeling wallpaper or loose drywall, in the walls and ceilings of your home. Replacing these blemishes with a fresh coat of paint can make the entire home look much more attractive and save you money on repairs in the future.
If you’re planning to have the exterior of your home painted, it’s a good idea to remove any items located near the house, such as outdoor furniture, grills, or trash cans. It would be best to cover any outlets or fixtures close to the house with tape and plastic sheets. This will protect them from the paint, dust, and debris that’s going to be generated during the cleaning and painting process.
It’s also a good idea to wash the home exterior with a hose and detergent solution or with a power washer before you start the painting project. This will eliminate dirt and grime, as well as any mildew that’s present on the surface.
The surface preparation of interior walls, ceilings, and wooden features is one of the most important parts of any home painting project. Dirty and worn-down surfaces must be optimally receptive to new coats of paint, resulting in an uneven finish that is difficult to correct once the painting process is complete. Executing the right surface prep solutions ensures that fresh coatings go on evenly and adhere to the surface for a long time. This can include washing the surface, scraping away old, loose paint, variable sanding, caulking seams to seal gaps, setting and spackling nailheads, patching holes and cracks, and more.
While these tasks might seem simple, it takes experience to get them right. The goal is to make sure the final result looks professional and crisp. It also helps to start with a comprehensive vision of the overall project, which includes details like color choices, paint types and finishes, room configuration, lighting, etc. If you need help approaching your project best, seek advice from a qualified interior painting contractor before starting.
A good quality painting contractor can give you detailed bids, along with the names and phone numbers of satisfied customers. Call two or three of these customers to ask questions about their experiences with the contractor and the quality of work they received.
Surface prep might involve various techniques, but it always starts with thorough cleaning. Dry debris, such as dust and pet hair, can be wiped down with a cloth, while more stubborn residues may need to be washed off using a mild detergent or dish soap. Once the surfaces are clean, they can be left to dry thoroughly.
Depending on the type of paint used, surface preparation might also include the application of a coat or two of primer. This is especially important if the existing paint on a surface is loose or cracked, which can cause it to flake. Priming the surface will allow new paint to adhere better and will often improve its appearance as well, making it more aesthetically appealing once it’s finished.
Painting the walls of your home is a relatively inexpensive and easy way to give your house a facelift. It also covers scratches, dents, and dings in the wall that occur from use over time and makes your home feel more comfortable. Choosing the right paint color is critical to creating an inviting and relaxing space and making your home look its best. Before beginning a painting project, it’s important to take the time to properly prepare the surface and protect floors and furniture from paint splatter. It’s also helpful to create a checklist of items that need to be completed before starting the actual project.
The first step in the home painting process is to apply a primer. This helps the new paint adhere to the walls and minimizes the number of coats needed. Primer should be applied to all surfaces, including trim, and left to dry for at least four hours.
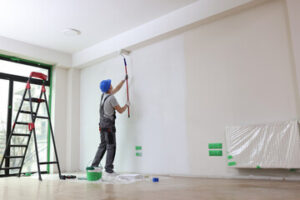
Once the primer is completely dry, it’s time to begin painting. Start at the top of the room and work your way down. Make sure to overlap your strokes and follow the ridges on the roller for even coverage. It’s best to use a small brush for detail work and for cutting in, which is painting the areas that can’t be reached with the roller. It’s also a good idea to apply two coats of paint and to let each coat dry for at least an hour.
It’s best to paint indoors and to avoid direct sunlight if possible. It’s also a good idea to avoid painting on days when the humidity is high, as moisture can cause the paint to bubble or not dry correctly.
When selecting a painting contractor, it’s always best to choose one with experience and a track record of satisfied customers. Request detailed bids and references from past clients, and feel free to contact a couple of them directly to learn more about their experiences working with the company.
It’s also a good idea to purchase low- or zero-VOC paint, which releases fewer toxins into the air than traditional varieties. This is especially important if you or your family suffer from allergies or respiratory issues.
Home painting is an exciting project that can enhance a house’s appearance and increase its resale value. However, it can also become taxing and stressful if not done properly. It is important to follow a step-by-step process and prepare for any obstacles that may come up along the way. This is why it is helpful to create a work checklist. This can help prevent miscommunication between the contractor and homeowner, as well as save time and money by eliminating rework.
Before a homeowner hires a contractor, it is important to meet with them in person. This allows the contractor to get a better understanding of the project and will help them give a more accurate estimate. It also provides the homeowner with a chance to ask any questions or voice any concerns they might have.
After the initial meeting, the homeowner should request a detailed bid from several contractors. It is also a good idea to ask for references from previous clients. This will allow the homeowner to see firsthand how the contractor performed and decide based on their satisfaction.
Once the contract has been written and the closing date is approaching, the homeowner will likely schedule a final inspection. The purpose of this inspection is to ensure that the house is in the same condition it was when purchased, as well as to check on any work agreed upon that still needs to be completed.
It is important to be prepared for the final inspection by requesting a timeline from your builder. This will help you know when to expect larger items to be completed and how long it might take for the contractor to return to address any issues.
It is also important to photograph each area with the painter’s tape. This will help you compare the finished product to the photos of the areas before the work is started. This will allow you to identify any issues that were missed or not addressed properly and address them accordingly. This can save a lot of hassle if an issue is discovered, as it will be easier to refer back to the previous photos.